

Guides

How to Use the High Pressure Valve on Your Inflatable SUP
Understand your inflatable SUP valve - inflate, deflate, attach your pump, and troubleshoot common issues. Expert advice from Aqua Fun NZ
Learn more
How to Deflate and Pack Down Your Inflatable SUP Board
Pack down your iSUP quickly and correctly every time. Our step-by-step deflation and rolling guide keeps your board in top shape - Aqua Fun NZ.
Learn more
How to Inflate Your Inflatable SUP Board: Step-by-Step Guide
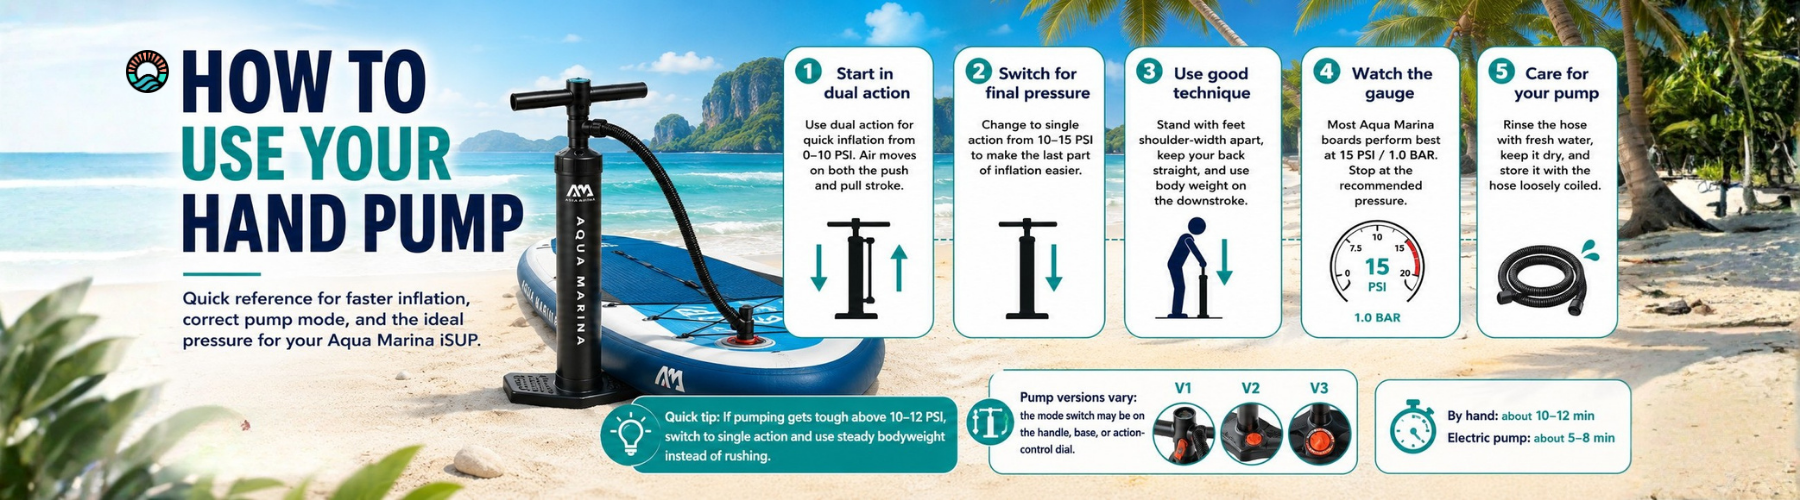
Got a brand new inflatable SUP and not sure where to start? Inflating your board correctly is the very first skill to nail and once you've done it a couple of times, it takes less than 10 minutes. Here's the complete step-by-step guide to inflating your Aqua Marina iSUP. What You'll Need • Your inflatable SUP board • The hand pump included with your board (or an optional electric pump) • A pressure gauge - most Aqua Marina pumps have one built in • About 10 minutes of your time Step-by-Step: Inflating Your iSUP Step 1: Unroll and Lay Out Your Board Find a flat, clean surface — grass, sand, or a smooth deck all work well. Unroll your board and lay it flat with the deck pad facing up. Make sure there's nothing sharp underneath that could puncture the material. 💡 Tip: Give the board a quick visual inspection before inflating, check for any damage from storage or transport before you start pumping. Step 2: Locate and Open the Valve The inflation valve is usually located near the tail of the board. Remove the valve cap by unscrewing it counterclockwise and set it somewhere safe — you'll need it again at the end. Check that the valve pin is in the UP (open) position before attaching your pump. The valve pin should be raised, not depressed. If it's pushed down, press it in and turn clockwise to lock it in the open position. ⚠️ Important: Always confirm the valve is in the open/inflate position before pumping. Pumping against a closed valve can damage the valve mechanism. Step 3: Attach the Pump Hose Connect the pump hose to the valve by pressing the hose connector firmly onto the valve and turning clockwise until it locks in place. Give it a gentle tug to confirm it's secure, a loose connection means wasted effort and air. Step 4: Start Pumping Begin pumping with steady, even strokes. Most Aqua Marina hand pumps are dual-action, meaning they pump air on both the push AND the pull stroke, which is much more efficient. Use your body weight and legs rather than just your arms to reduce fatigue. • Use both hands on the pump handles for control • Stand with feet shoulder-width apart for stability • Keep a steady rhythm - don't rush 💡 Tip: The first half of inflation is easy. The last few PSI feel much harder, this is normal! Use your bodyweight to push through the resistance. Step 5: Inflate to the Correct Pressure Most Aqua Marina SUP boards are designed to be inflated to 15 PSI (pounds per square inch) for optimal rigidity and performance. Check your specific board's manual for its recommended pressure. • 10 PSI - Board will float but feel soft and flexible - not recommended for paddling • 12–13 PSI - Acceptable but not optimal • 15 PSI - Ideal for most Aqua Marina boards - firm, rigid, performant • Above 15 PSI - Do not exceed maximum rated pressure ⚠️ Never over-inflate: Exceeding the maximum pressure can cause seam failure and will void your warranty. Always use a pump with a gauge and stop at 15 PSI. Step 6: Detach the Pump and Replace the Valve Cap Once you've reached the correct pressure, disconnect the pump hose by pressing the release lever or turning counterclockwise. Air loss during disconnection is completely normal — you may hear a brief hiss. This is the hose venting, not your board deflating. Screw the valve cap back on firmly to keep out water and debris. Step 7: Attach Your Fins Most Aqua Marina boards use a slide-in fin system. Slide the fin into the fin box from the front and lock it with the provided clip or screw. Your board is now ready to hit the water! Electric Pump Option If you paddle regularly or find hand pumping too strenuous, an electric pump is a game-changer. Aqua Fun stocks Aqua Marina electric pumps that automatically stop at your target pressure - just set it, switch it on, and let it do the work. 🔌 Note: Electric pumps require a 12V car power outlet or a compatible power bank. Always supervise an electric pump and never leave it unattended. How Long Does Inflation Take? • Hand pump (dual action): 8–12 minutes • Electric pump: 5–8 minutes Inflation time depends on board volume, larger touring and all-round boards take longer than smaller boards.
Learn more
What is the Serial Number on My SUP Board and Where Do I Find It?
Can't find your SUP board's serial number? Learn where to look and why it matters for warranty, support, and parts - quick guide from Aqua Fun NZ.
Learn more
How to Take Care of Your Inflatable SUP Board: Make It Last for Years
A little care goes a long way. Learn how to clean, store, and maintain your inflatable SUP board to make it last for years - Aqua Fun NZ.
Learn more
How to Safely Fall Off Your SUP Board (Yes, There's a Right Way!)
Falling off your SUP is inevitable - but there's a right way to do it! Learn how to fall safely and get back on your board with Aqua Fun NZ.
Learn more
How to Set Your iSUP Paddle Height: Get It Right Every Time
Get your SUP paddle height right and paddle further with less effort. Learn the simple shaka method for perfect paddle length - Aqua Fun NZ.
Learn more
How to Hold Your SUP Paddle Correctly (And Why It Matters)
Holding your SUP paddle wrong is the most common beginner mistake. Learn correct blade orientation, grip width, and hand position with Aqua Fun NZ
Learn more
Best Places to SUP & Kayak in Christchurch: Paddle the Garden City
From the Avon River to Akaroa Harbour, explore the best SUP and kayaking spots in Christchurch and the Banks Peninsula with Aqua Fun NZ.
Learn more